Monday, March 28, 2011
Friday, March 25, 2011
Chick Magnet

Tuesday, March 22, 2011

Friday, March 18, 2011
A CHANDELIER FOR MY SCRAPBOOK ROOM!!!
 |
This is my new chandelier for my scrapbook room.....Oooh La La! I am thrilled with the way it makes my room sooooo feminine! Now, I want to spend all of my spare time in there!
|

Thursday, March 17, 2011
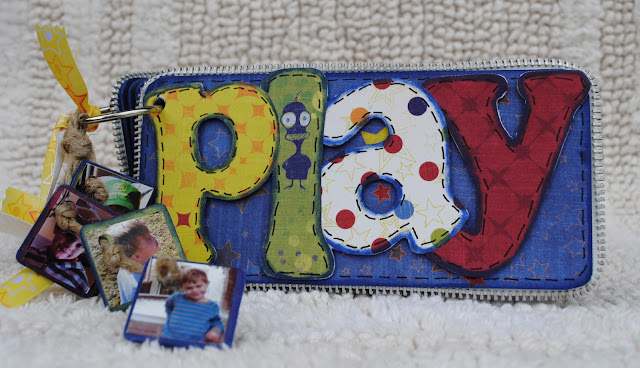
MAYA ROAD CHIPBOARD "PLAY" MINI ALBUM
This is a mini album that I made as a design team member of "The Crafty Scrapper" in Waxahachie, Texas. It was a JOY to make this little book that is about 3"x 6". This is the front cover....The lazer cut letters were traced and the pp glued on, then sanded along the sides and doodled around the edges of each letter. Also, I printed out some 1" X 1" pictures for the little squares that hang from the top ring by jute twine. On the opposite side of the pics are the letters "B" "O" "Y" "S", using Maya Road Micro Chips and Chipboard Alphabet, called Jonathan. They were painted with Adirondack Acrylic Paint Dabber “Snow Cap”, then I doodled the "stitching". Here's what REALLY sets this little book off: The Maya Road Zipper Trim...now, does that just scream "little boy", or what?! The zippers come in several colors. This one is in white. The yellow ribbon is "Just Imagine" by Imaginisec. You can get all of these supplies for this project at "The Crafty Scrapper" in Waxahachie, Texas. Here's the link: http://www.thecraftyscrapper.com/staff/
|
 |
On each page I glued the pp and let it dry, then sanded around the edges of each page and inked, using Cats Eye Ink.
|
This Maya Road Mini Chipboard album is perfect for boys or girls! Isn't the Maya Road ticket perfect for journaling?

 |
On each page I glued the pp and let it dry, then sanded around the edges of each page and inked, using Cats Eye Ink.
|
This is the back cover....I thought it would be cute to do the word backwords. The lazer cut letters were traced and the pp glued on, Then sanded along the sides and doodled around the edges of each letter......there's that ADORABLE ZIPPER again!
|
Tuesday, March 8, 2011
"CREATE BANNER"
On display at The Crafty Scrapper in Waxahachie, Texas is this sunny banner that I made as a design team project. The banner was made to decorate a scrapbook room, and hopefully inspire the artist. First, I misted all six canvas pieces in "Sunflower". While waiting for them to dry, painted the Maya Road Alphabet Philadelphia-Lowercase" chipboard letters with "Peeled Paint" Crackle Paint. Next, I typed quotations related to creativity, making an Acrostic Poem, of sorts. These were all printed on the Glitz Designs, Love Games "Scorecard". For some definition, I inked around the quotations using Ranger Adirondack "Lettuce", then stitched around each quotation with burnt orange thread. Using my Cricut Personal Diecut Machine and the "Serenade" Cartridge, I cut out the scalloped circles to fit inside the Maya Road Bottle Caps "Super Mega" size. Next, I hand cut some of the floral sections of the Laced With Grace "Floral" patterned paper by Glitz Designs. Then, I went back to the canvas and sprayed it with "Seafoam Green" Mist by Maya Road. On each piece of canvas I glued one "Super Mega" bottle cap with the scalloped circle and one of the painted and crackled letters. Tucked under each bottlecap is one bit of the hand cut roses. Each piece of canvas has either a Maya Road Trinket Blossom velvet flower (see picture below) or a Prima Fairytale Rose in "Buttercup". Last, I attached each of the six little canvases to a six foot stretch of green jute twine and added ribbons by May Arts in the orange, yellow and green color scheme. 


Friday, March 4, 2011
Memory From a Winter Day
What a fun project this was for The Crafty Scrapper in Waxahachie, Texas! This design team layout is made using Maya Road and Little Yellow Bicycle products. The patterned paper is all from the "Twig Collection" by Little Yellow Bicycle, as are the feathers and little Flower Button Dots. All chipboard pieces are by Maya Road "Half Circle Banner Pieces" and "Snapshot Words Keychain". Also used, was Maya Road Candy Stripes Blossoms (ribbon flower), Ranger Ink (lettuce), Making Memories paint (Chocolate), Flower Soft (Polar White and Glue). Techniques used were painting, distressing, inking, machine stitching and embossing. The photos were taken by me during our "Deep Freeze" here in Texas.....I had a ball taking pics of our little critters just outside our kitchen windows! Aren't these little guys PRECIOUS?!!! 

Here are the upclose details. There really is more dimension in this LO than first meets the eye.

Thursday, March 3, 2011
1210 Welch
This is a layout that I did of my maternal grandparent's home in Houston, Texas. It was inspired by a little piece of broken china that has the following written on it, "To every bird, her nest is beautiful". I found the broken china piece at "The Dove's Nest", in Waxahachie, Texas. It is the gift shop and tea room that is right next to The Crafty Scrapper. My BFF, Ginger and I love to shop and have lunch at "The Dove's Nest" when we are in Waxahachie for an all day crop. It's one of our favorite things to do together. Since I'm ALWAYS looking for interesting things to add to my LO's I fell in love with the little piece of china, and I knew immediately that my Granny would love that I used it for a LO about her home. The patterned paper is by 7 Gypsies, and is called "Conservatory Collection" The brightly colored bird is a piece of antique scrap from Granny's collection, and the lace flower is by Prima....who else?!!! The feather at the bottom of the LO is from Little Yellow Bicycle's "Twig Collection" and the title, "1210 Welch" is from Graphic 45. The photographs of Letitia and her home were taken in the 1920's. For this layout, I did some distressing, inking, tearing and cut work. Thanks for taking a peek! 


Subscribe to:
Posts (Atom)




.jpg)
